
Create a positive pay file
A positive pay file lists the checks you’ve written. You upload it to your bank, and the bank clears only the checks in the file.
Set up positive pay
Section titled “Set up positive pay”-
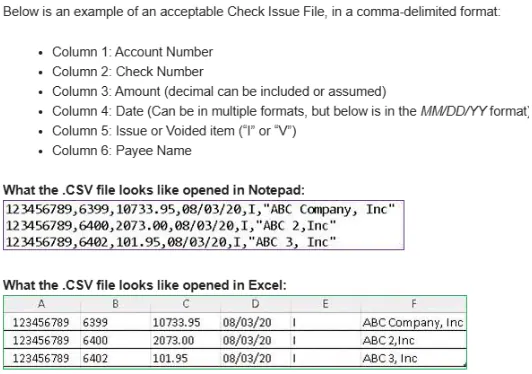
Send your bank’s positive pay upload format to Nexsyis Support. For example, a bank might ask for a comma-delimited file like this:
-
Nexsyis sets up the format for you. See Positive pay template reference.
-
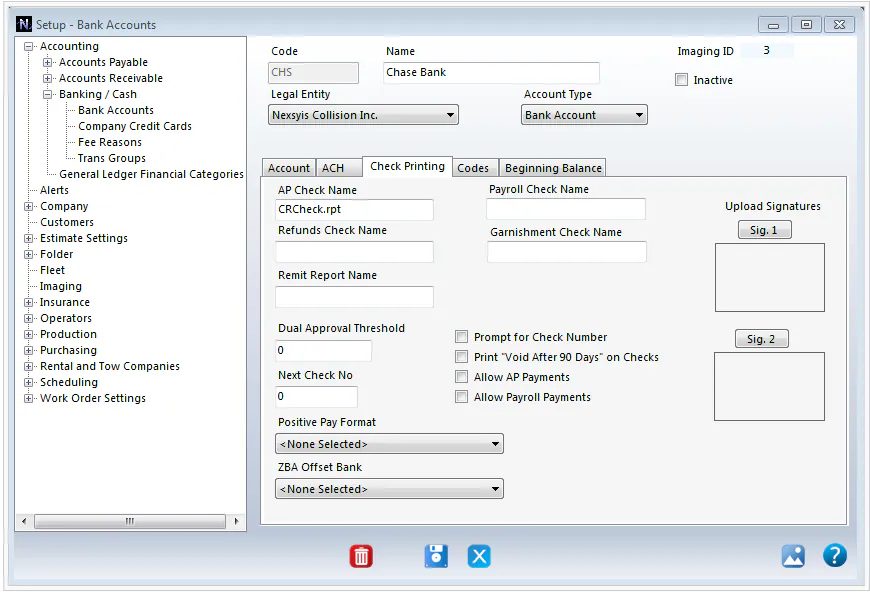
Select the format on the bank account: open Setup › Accounting › Banking / Cash › Bank Accounts, select the bank, and on the Check Printing tab select the Positive Pay Format.
Permissions required
Section titled “Permissions required”To create a positive pay file, the user needs:
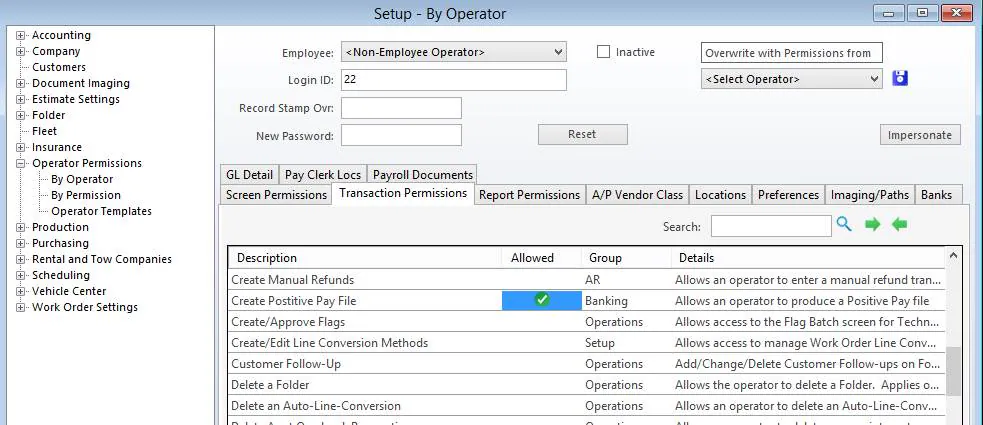
- The Create Positive Pay File transaction permission. On screen it’s spelled Create Postitive Pay File, in the Banking group.
- A/P Pmts permission for the bank account.
Create a positive pay file
Section titled “Create a positive pay file”-
On the Accounting tab, select Create Positive Pay File.

-
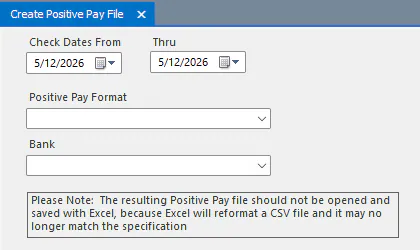
Select the date range of the checks to include in Check Dates From and Thru.
-
Select a Positive Pay Format.
-
To include one bank only, select it in Bank. Leave Bank blank to include every bank you have permission for that uses that format.
-
Select Save.
Only checks from banks where you have check printing permission, and that use the selected format, are included.
Positive pay template reference
Section titled “Positive pay template reference”A positive pay template has an optional header line, one detail line per payment and an optional total line. Templates are set up by Nexsyis in the BAPositivePay and BAPositivePayFields tables.
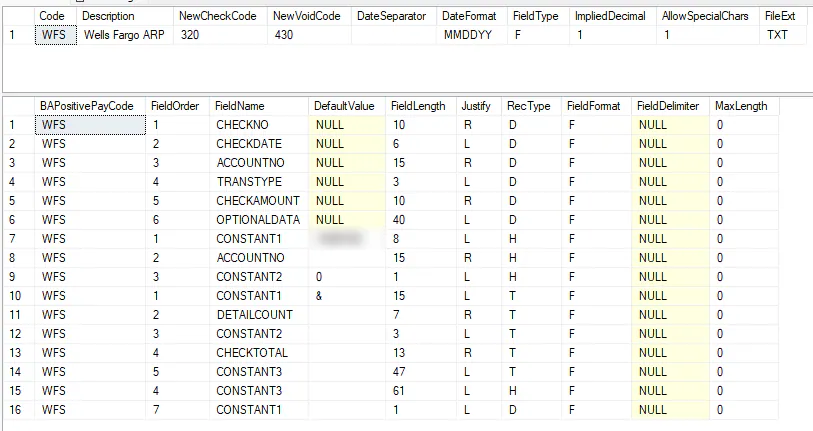
File formatting values
Section titled “File formatting values”| Value | Description |
|---|---|
| NewCheckCode | Code for original payments. |
| NewVoidCode | Code for voided payments. |
| DateSeparator | Character between month, day and year, for example - or /. |
| DateFormat | Date format, for example MM-DD-YYYY or MM/DD/YYYY. |
| FieldType | F = fixed length; V = variable length. |
| ImpliedDecimal | 1 = implied decimal (3267 for 32.67); 0 = include the decimal. |
| AllowSpecialChars | 1 = strip non-alphanumeric characters; 0 = allow all characters. |
| FileExt | File extension to add. |
Line formatting values
Section titled “Line formatting values”| Value | Description |
|---|---|
| FieldOrder | Position of the field in the line. |
| FieldName | Field constant (see the lists below). |
| DefaultValue | Value to repeat on every line (optional). |
| FieldLength | Length of the field (fixed length only). |
| Justify | L = left; R = right (fixed length only). |
| RecType | D = detail; H = header; T = total. |
| FieldFormat | F = fixed; V = variable. |
| FieldDelimiter | Delimiter for variable length (defaults to a comma). |
| MaxLength | Maximum characters for variable-length fields (0 = no limit). |
Field constants
Section titled “Field constants”Header line
- ACCOUNTNO: account number
- CDAACCTNO: Canadian account number
- FILEDATE: file creation date
- BRANCHTRANSIT: Canadian ABA transit number
- FILENUMBER: unique ID that increases with each file (assigned by Nexsyis)
- CONSTANT1 to CONSTANT5: custom constant values
- SPACE: space characters
Detail line
- ABATRANSIT: ABA transit number
- ACCOUNTNO: account number
- CHECKNO: payment or check reference number
- CHECKDATE: payment date
- CHECKAMOUNT: payment amount
- TRANSTYPE: NewCheckCode or NewVoidCode
- VOIDIND: “V” for voids; otherwise a space (fixed) or empty (variable)
- VOIDDATE: void date
- OPTIONALDATA: check register description (special characters removed if applicable)
- PAYEENAME: check register description (special characters removed if applicable)
- SPACE: spaces for the field length
- CONSTANT1 to CONSTANT5: custom constant values
Total line
- ACCOUNTNO: account number
- CHECKTOTAL: sum of all payments
- DETAILCOUNT: number of detail lines
- CONSTANT1 to CONSTANT4: custom constant values
- SPACE: spaces for the field length