
Set up resource-based appointments
With resource-based appointments, each estimator has their own appointment schedule and their own daily maximum. When an estimator reaches their maximum for the day, their remaining slots are removed from the Scheduling screen, so they can’t be overbooked.
You can switch every location to resource-based appointments, or only the locations that need it.
Before you begin
Section titled “Before you begin”- An appointment type is either resource-based or not, for every location. If you select Resource Based Appointment on your existing estimate appointment type, every location that uses it changes. To switch only some locations, create a second estimate appointment type for them, as described below.
- Set up every estimator at the location. Don’t mix resource-based and non-resource-based estimates at one location. The open slots would have no estimator’s name on them, so they could still be booked and estimators could be overbooked.
Step 1: Take the location off the existing estimate appointment type
Section titled “Step 1: Take the location off the existing estimate appointment type”Skip this step if you’re switching every location to resource-based appointments.
- Open Setup › Scheduling › Appointment Types.
- Open your existing estimate appointment type.
- Remove the location you’re switching.
- Select Save.
Step 2: Remove the location’s non-resource estimate schedule
Section titled “Step 2: Remove the location’s non-resource estimate schedule”- Open Setup › Scheduling › Non-Resource Appointment Schedule.
- Choose your existing estimate appointment type.
- Delete the schedule for the location you’re switching.
If you skip this step, the location shows both open estimate slots and resource-based estimate slots.
Step 3: Create a resource-based estimate appointment type
Section titled “Step 3: Create a resource-based estimate appointment type”Skip this step if you’re switching every location. Instead, open your existing estimate appointment type, select Resource Based Appointment, and save it.
- Open Setup › Scheduling › Appointment Types and create a new appointment type.
- Enter a Code that’s different from your existing estimate type, for example ESTI if the existing one is EST. The code can’t be changed after it’s saved.
- Enter the Description, for example Estimates. It can match your other estimate type’s name, so the location’s staff see it as a normal estimate.
- Select Resource Based Appointment.
- Set the Appointment Class to Estimate.
- Choose a Text Color and Back Color that are easy to read on the Scheduling screen.
- Under Max per day by location, enter the most estimates the whole location can take each day, for all estimators combined. For example, three estimators who can each take three estimates a day is 9.
- Select Save.
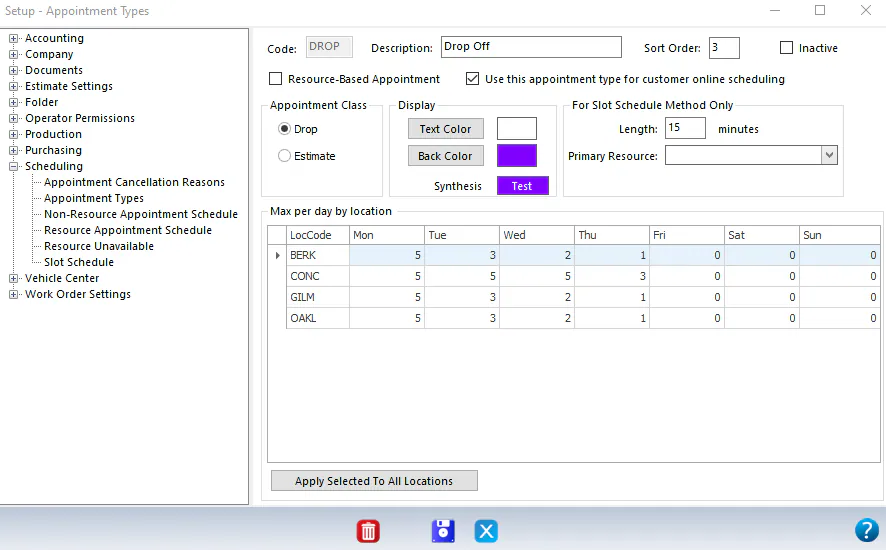
You don’t need to change Location Daily Limits.
Step 4: Set up each estimator’s schedule
Section titled “Step 4: Set up each estimator’s schedule”Do this for every estimator at the location.
-
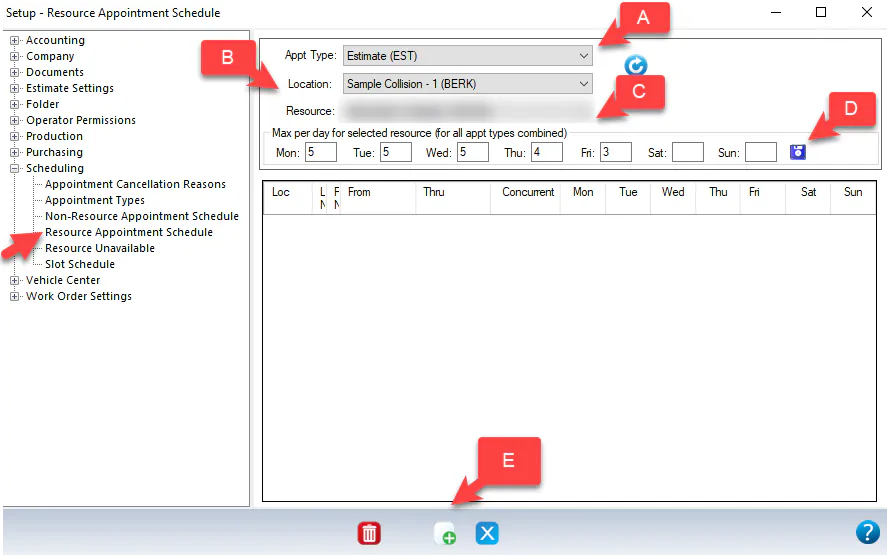
Open Setup › Scheduling › Resource Appointment Schedule.
-
Choose the Appt Type (your resource-based estimate type), the Location and the Resource (the estimator).
-
Under Max per day for selected resource (for all appt types combined), enter the most estimates this estimator can take each day, for example 3. Then select the save icon next to it.
-
Select the new-record button to create the estimator’s schedule.
-
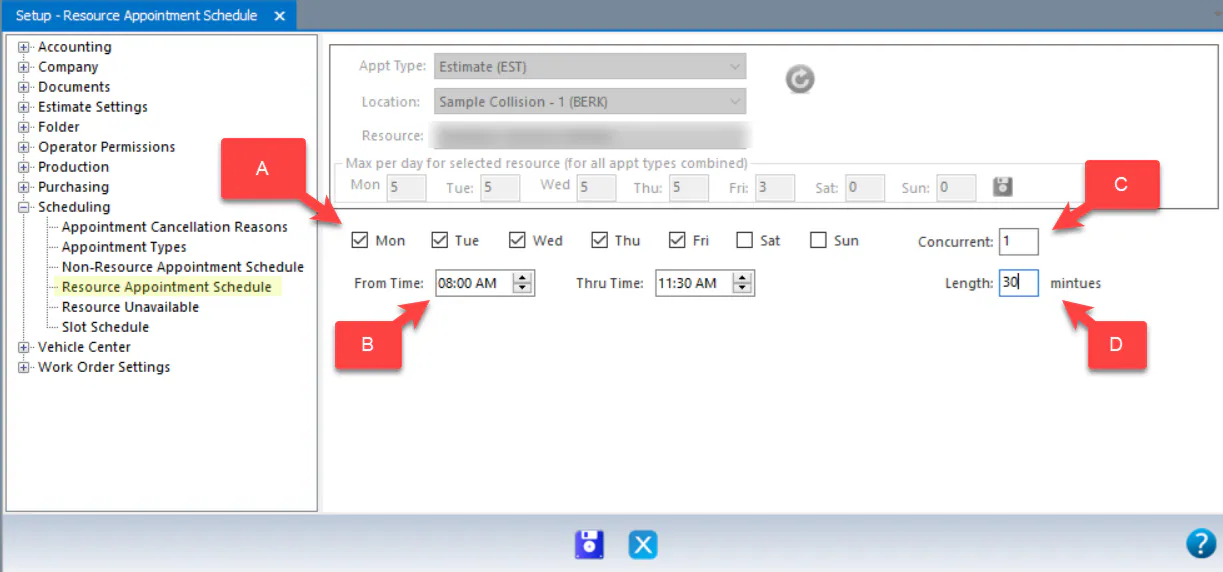
Select the days this schedule applies to.
-
Enter the From Time and Thru Time, for example 8:00 AM to 5:00 PM.
-
Enter Concurrent, for example 1 so the estimator has one appointment at a time.
-
Enter the Length in minutes, for example 60.
-
Select the save icon.
- Repeat for the next estimator.
Different hours on some days
Section titled “Different hours on some days”If an estimator works different hours on some days, create a separate schedule for those days.
For example, if your estimators have a meeting every Tuesday from 8:00 to 10:00 AM:
- Create one schedule for Monday, Wednesday, Thursday and Friday, from 8:00 AM to 5:00 PM.
- Create a second schedule for Tuesday, from 10:00 AM to 5:00 PM.
This keeps the Tuesday meeting off the Scheduling screen every week. For a one-time meeting or time off, see Block time when a resource is unavailable.
How the Scheduling screen looks
Section titled “How the Scheduling screen looks”Once the location is set up, the Scheduling screen shows a slot for each estimator at each time in their schedule, with the estimator’s name in the Appointment Resource column. For example, an estimator with a 60-minute Length from 8:00 AM to 5:00 PM has a slot every hour.
When an estimator has as many appointments as their daily maximum, their remaining slots for that day disappear.
Show the Appointment Resource column
Section titled “Show the Appointment Resource column”If you don’t see the Appointment Resource column:
- On the Scheduling screen, right-click a column heading and select Column Chooser.
- Add Appointment Resource from the list.
- Right-click the grid and select Save My Grid Layout so the column stays.
Make the screen easier to read
Section titled “Make the screen easier to read”With a slot for every estimator, the Scheduling screen can look busy. To make it easier to read:
- Filter the screen. At the top of the Scheduling screen, choose the appointment type, for example Est, to see only estimates. Or choose an Appt Resource to see one estimator’s slots.
- Use a longer Length. If an estimator can take only three estimates a day, a Length of 120 minutes instead of 60 halves the number of slots. When you book the appointment, you can still change the time, for example to 11:30 AM.
- Use NexsyisNow. The schedule in NexsyisNow lets you switch between what’s available and what’s scheduled, filter by resource, see the month, and show estimates only.
If no estimate slots show
Section titled “If no estimate slots show”Check each screen again:
- Appointment Types: the resource-based estimate type has Resource Based Appointment selected and a Max per day by location for the location.
- Non-Resource Appointment Schedule: if you created a second estimate type, the location no longer has a schedule for the old one.
- Resource Appointment Schedule: each estimator has a max per day saved, and at least one schedule entry for that day of the week.