Customize In Process columns and views
Set up the In Process list to show the information your team needs. On desktop, choose columns and save them as views. In NexsyisNow, choose the data shown on each card.
Add or remove columns
Section titled “Add or remove columns”Right-click a column header and select Column Chooser, then double-click a column to add it. To keep your columns, right-click the grid and select Save My Grid Layout. For more ways to change columns, see Search, filter and save grid views.
The columns you can add are listed in In Process columns below.
Use views
Section titled “Use views”A view is a saved set of columns and filters. Views are listed in the View drop-down at the top of the screen.
Change the view
Section titled “Change the view”Select a view from the View drop-down.
Set a view as your default
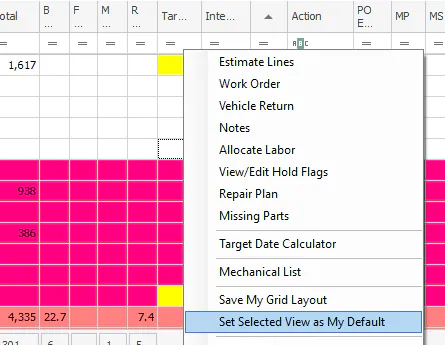
Section titled “Set a view as your default”Right-click the grid and select Set Selected View as My Default. That view loads when you open the tab.
Create a view
Section titled “Create a view”- Set up the columns and filters you want.
- Select New View.
- Type a name for the view.
- To save your filters with the view, check Include selected filters with saved view.
- Select OK.
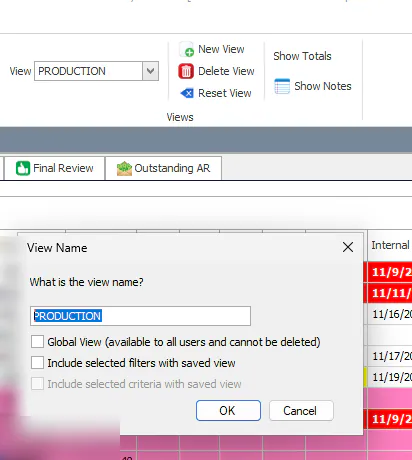
If you have the Allow editing/creation in Vehicle Center of Global grid views permission, you can also check Global View (available to all users and cannot be deleted) to make the view available to all users.
Edit a view
Section titled “Edit a view”- Select the view, then change its columns and filters.
- Select New View.
- Leave the name the same, then select OK. This saves over the existing view.
Delete a view
Section titled “Delete a view”- Select the view.
- Select Delete View, then select OK.
Users who don’t have permission for global views can’t delete global views.
Group by status
Section titled “Group by status”Check Group By Status to split the In Process grid into three grids:
- In Progress: the current stage is started.
- Ready: the current stage is completed.
- On Hold: the current stage is paused.
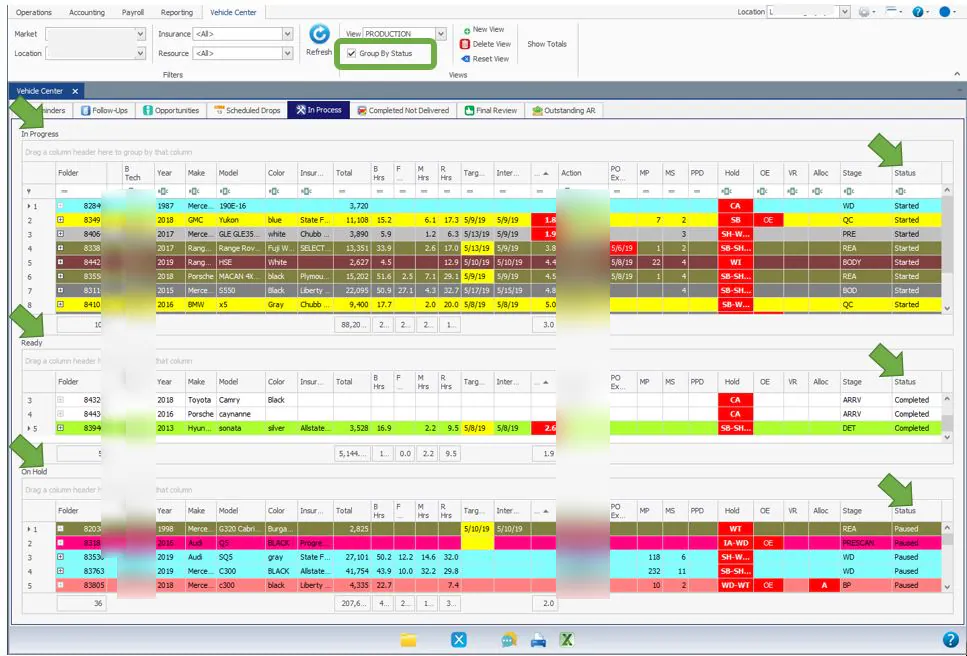
You can customize each grid separately and save the layout as a view.
Plan paint with the Refinish date
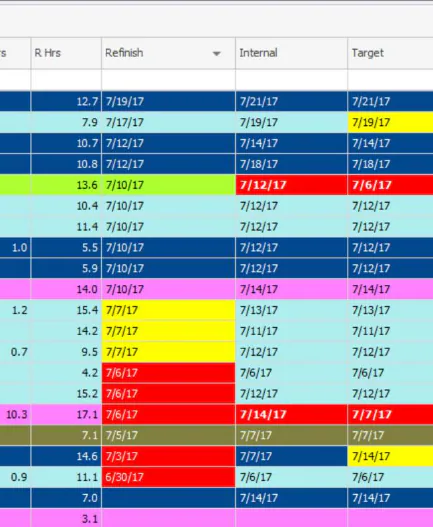
Section titled “Plan paint with the Refinish date”The Refinish column holds the date you expect the vehicle to be in paint.
- Add the Refinish column from the Column Chooser, then save your grid layout.
- Select a cell in the Refinish column and choose the date.
The Refinish date turns yellow the day before the paint date and red on the paint date. Vehicles with a red Refinish date should be in the paint stage.
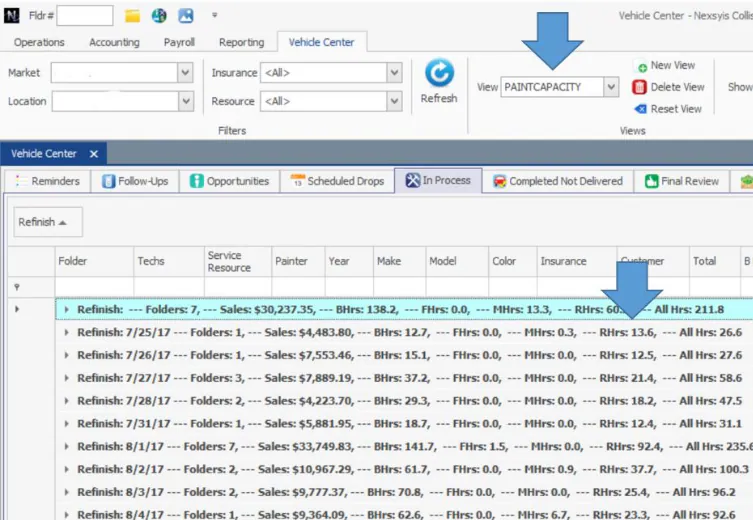
To see how many hours are scheduled for paint each day, create a view named, for example, Paint Capacity that groups the grid by Refinish. When you select that view, the grid shows the folders and hours for each Refinish date.
In Process columns
Section titled “In Process columns”| Column | What it shows |
|---|---|
| Action | Short notes you type, or choose from a list. Set up the list in Setup › Production › Actions. Not related to folder notes. |
| ActualStart | The date the vehicle started its current stage. |
| Alloc | Labor still needs to be allocated to a technician. |
| Arrival | The date the vehicle arrived. Set on the folder. |
| Assgn | Shows 1 when Assignment is checked on the folder Summary tab. |
| B Hrs | Total body labor hours. |
| CAT | Shows a check mark when CAT Claim is checked on the folder Summary tab. |
| Clm No | The claim number of the primary estimate. |
| Color | Vehicle color. |
| CT | Cycle time, calculated from labor hours and the arrival date. |
| Customer | Customer name. |
| D Hours | Detail hours. |
| Days in Shop | The number of days the vehicle has been in the shop. |
| Drop | The drop appointment location, shown when it’s different from the folder location (for example, after a transfer). |
| Est Status | Which supplement the estimate is on, or how many times it has been updated. |
| Excp | The number of exceptions on the folder. An asterisk (*) means the folder has changed and the count may be out of date; open the Exceptions screen to update it. |
| F Hrs | Total frame labor hours. |
| F1–F8 | Free-text columns. See Set up Vehicle Center custom columns. |
| Fleet | The fleet assigned to the folder. |
| Folder | Folder number. |
| H1–H8 | Flag columns. See Set up Vehicle Center custom columns. |
| Hat No | The hat number, set by editing the vehicle information on the folder. |
| Hold | A hold flag is set on the folder. See Put a vehicle on hold. |
| HPD | Hours per day, calculated from labor hours and the internal date. |
| Hrs | Total hours on the job. |
| In Date | The day the vehicle entered the first stage after arrival. |
| Insurance | The insurance company on the primary estimate. |
| Int Wrk Days | Internal work days: how many work days the vehicle has been in the shop. |
| Internal | The date production expects to finish. Turns red when it’s behind the target date or the current date. |
| Loc | Vehicle location. |
| M Hrs | Total mechanical labor hours. |
| Make, Model, Year | The vehicle. |
| MCP | Missing critical parts: how many critical purchases are still missing. |
| MP | Missing parts: how many parts aren’t marked received. Double-click to see the lines in the Purchase Assistant. |
| MS | Missing sublets: how many sublet operations still need to be ordered and received through the Purchase Assistant. Double-click to see them. |
| Paint Code | The vehicle’s paint code, added by editing the vehicle information on the folder. |
| Paint Materials | The dollar amount of paint materials on the folder. |
| Painter | The refinish technician assigned to the job. |
| PO Expect | The latest expected delivery date of all the folder’s POs. Double-click to see the PO. See Set an expected delivery date. |
| PPD | The number of purchase price difference exceptions on the job. Double-click to see them on the Exceptions screen. |
| Pre-Tax Total | The estimate amount before taxes. |
| Pri | Priority. Type a number to set the vehicle’s priority. See Set technician priorities and print production lists. |
| QC | The number of QC items on the folder. |
| R Hrs | Total refinish labor hours. |
| Refinish | The date the vehicle should be in paint. |
| Rental Name | The rental company set on the folder Summary tab. |
| Rental Pay | Who pays for the rental: I (insurance), C (customer) or S (shop). |
| Repair Category | The repair category on the folder. |
| Resource | The service resource set on the folder. |
| Sch Drop Appt | The drop-off appointment date. |
| Stage | The vehicle’s production stage. Double-click to change it. |
| State | The customer’s state. |
| Status | For Advanced Repair Plan users: the status of the stage, Started, Paused or Completed. |
| Target | The date promised to the customer. Turns yellow when the target date has been changed, and red when it’s behind the current date or the internal date. |
| Target Change | How many times the target date has been changed. |
| Tech | The body technician allocated to the job. |
| Techs | All technicians allocated to the job. |
| Total | Total dollar amount of the job. |
| Tow In | Whether the vehicle was towed in. |
| Type | Claim type, for example GEICO ARX. |
| VR | The folder is a vehicle return. The folder number also shows with a red background. |
| Xfer | The location the vehicle was transferred from. |
Other columns are used in calculations, such as cycle time, and aren’t meant to be shown. A two-letter column that isn’t listed here is probably a custom hold flag column. Check Setup › Production › Holds for its description.
Before you begin
Section titled “Before you begin”Changing what the In Process cards show needs the Select In Process Data Display on NexsyisNow permission. The card layout is a company-wide setting: your changes apply to every NexsyisNow user, so everyone sees the same board.
Collapsed and expanded cards
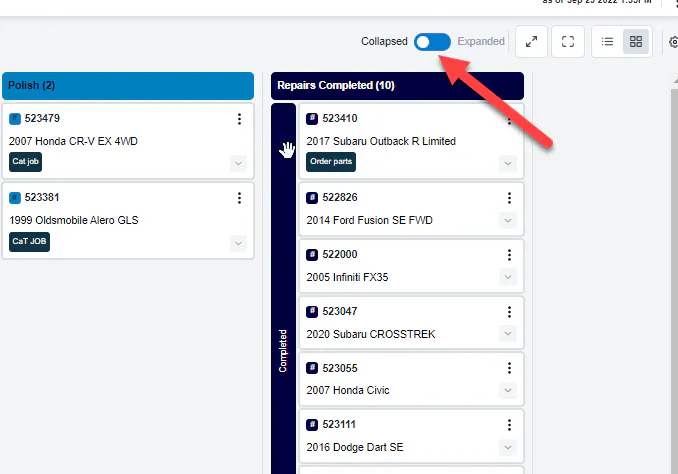
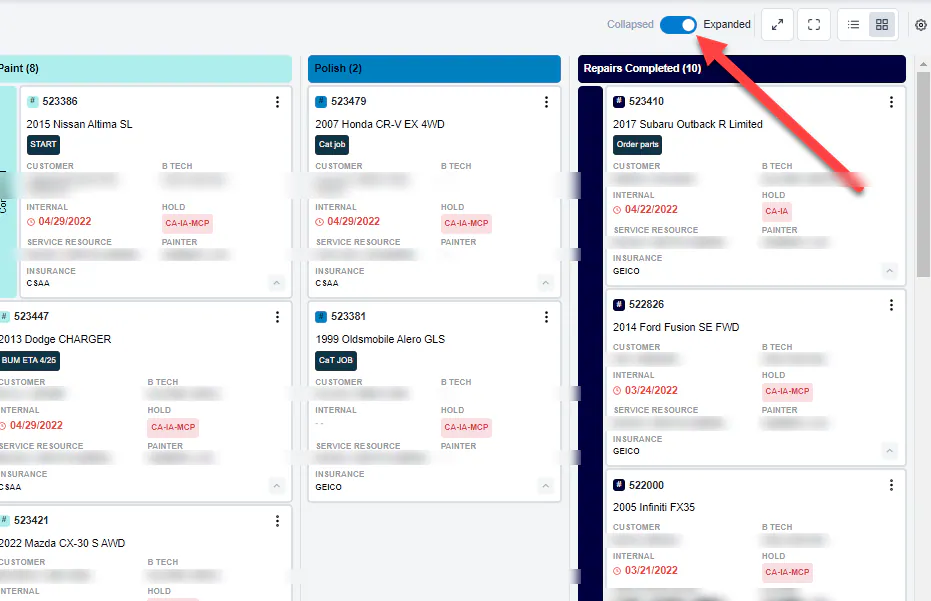
Section titled “Collapsed and expanded cards”Use the Collapsed / Expanded toggle at the top right to switch between the two card views.
-
Collapsed cards are smaller, so more fit on the screen. They show only the folder number, the vehicle and the actions. You can’t change what collapsed cards show.
-
Expanded cards show more data, and you can choose which data.
Choose the data on expanded cards
Section titled “Choose the data on expanded cards”By default, expanded cards show Customer, Internal, Service Resource, Insurance, B Tech, Hold and Painter.
-
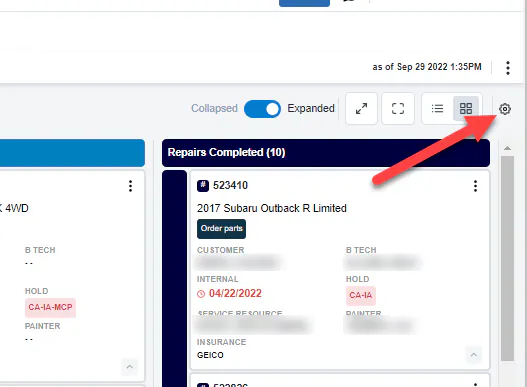
Select the gear icon at the top right of the In Process board.
-
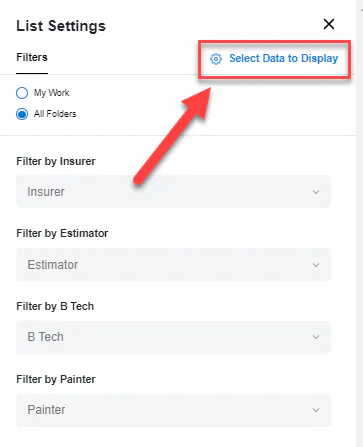
In the panel that opens on the right, select Select Data to Display.
-
Check the data you want to show. Checked items move to the top of the list. Drag them by their handles to change the order they show in.
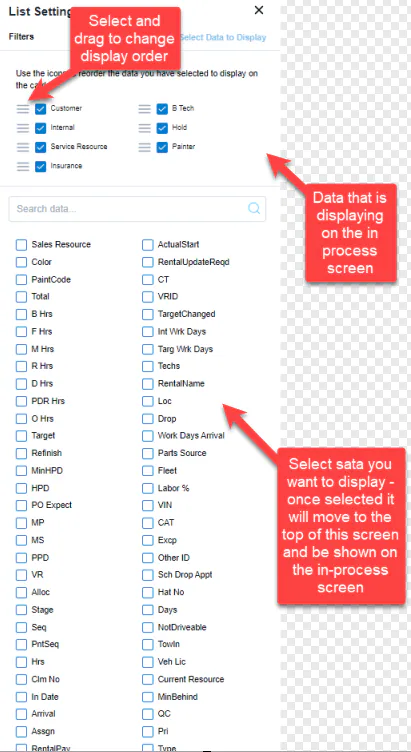
Your changes save automatically and apply to all NexsyisNow users.
Other board settings
Section titled “Other board settings”-
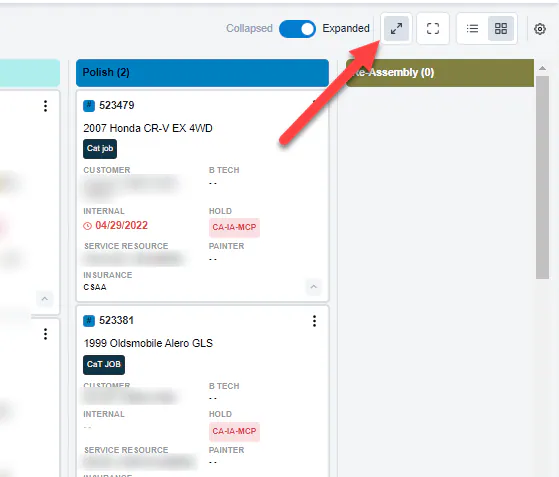
Show all stages: select the arrow icon to show every repair plan stage. Select it again to hide stages that are empty.
-
Make room for more cards: select the box icon to hide At a Glance and the top ribbon so more cards fit on the screen. Select it again to show them.
-
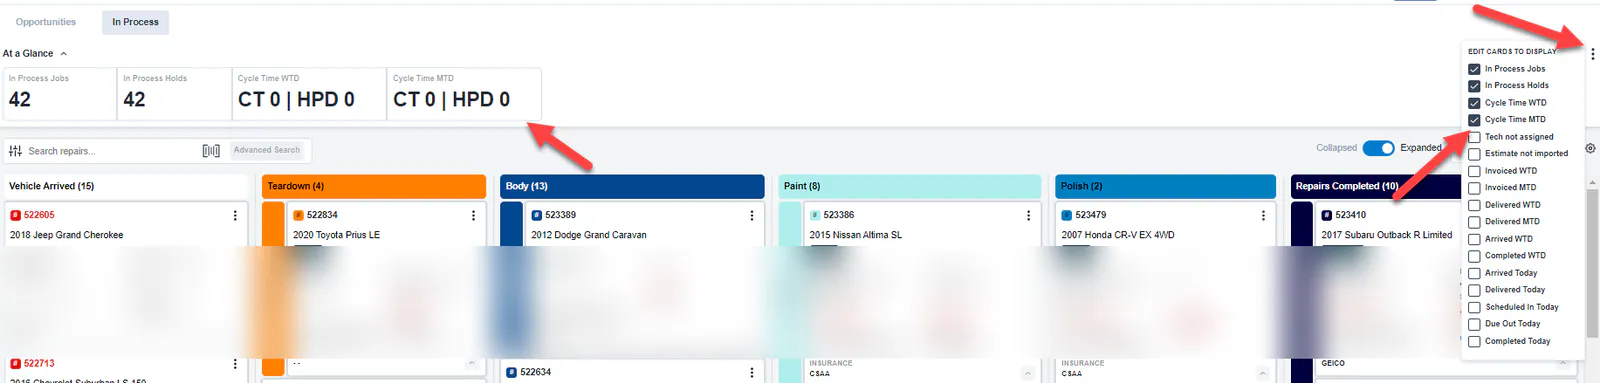
Choose the At a Glance tiles: select the three dots at the top right of the At a Glance ribbon, then check the data you want to show at the top of the screen.