
Set up a location
Add each shop location in Nexsyis so you can use it for folders, production, purchasing and accounting. This page also explains the options for setting up a location you’re acquiring.
Before you begin
Section titled “Before you begin”You need the Location screen permission (Add/Change/Delete) to make changes on the Location Setup screen.
Add a location
Section titled “Add a location”- Go to Setup › Company › Locations.
- Select New at the bottom of the screen.
- Fill in the top section and the General tab (see the fields below).
- Select Save.
After you save, you can go back and fill in the Profile and Web tabs.
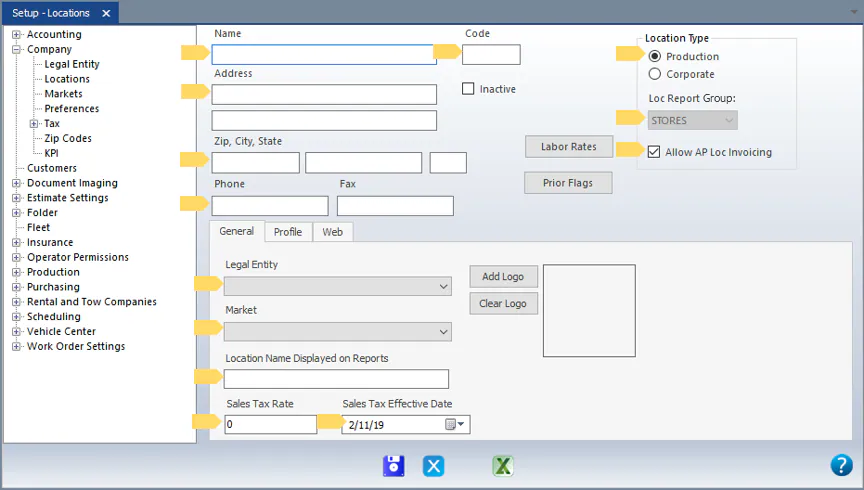
Top section
Section titled “Top section”- Name: the location’s name.
- Code: the location code or abbreviation, for example “01” or “ABC”.
- Address: the street address.
- Zip, City, State: type the zip code first and press Enter. The city and state fill in automatically.
- Phone and Fax.
- Location Type: choose Production if you want the location to show on your production screens, such as the Scheduling screen, Vehicle Center and Purchase Assistant. Otherwise, choose Corporate.
- Loc Report Group: used mainly in financial reporting. Leave it as the default, STORES, unless the location isn’t a shop.
- Allow AP Loc Invoicing: select this if AP invoices can be posted to this location.
General tab
Section titled “General tab”- Legal Entity
- Market
- Location Name Displayed on Reports: the location name printed on Nexsyis reports, such as the final invoice, estimate and purchase order.
- Sales Tax Rate: the location’s sales tax rate as a decimal. For example, enter 8.25% as 0.0825.
- Sales Tax Effective Date: unless the rate has changed, enter January 1 of the current year for a new location.
- Add Logo: if this location’s logo is different from the legal entity’s logo, upload it here. Keep it about 100–150 pixels wide. If most of the logo doesn’t fit in the box shown, it will likely look distorted on printed reports.
Set up a location you’re acquiring
Section titled “Set up a location you’re acquiring”When you’re acquiring a shop, choose one of these ways to set up its location before go-live.
Option 1: Active, Corporate type
Section titled “Option 1: Active, Corporate type”Set the location up as active, with the Corporate location type. You can post financial activity.
- Pros: you can record financial activity right away, and the location exists in Nexsyis before go-live.
- Cons: corporate locations are left out of some setup areas, such as vendor sourcing, so some setup can’t be done in advance.
- Best when: you need to post financial activity early, and limited setup in advance is acceptable.
Option 2: Inactive, Production type
Section titled “Option 2: Inactive, Production type”Set the location up as inactive, with the Production location type. You can’t post financial activity.
- Pros: you can complete the full setup in advance. Only users with the New Location Setup Permission transaction permission can see the location, so the acquisition stays private until go-live.
- Cons: you can’t post financial transactions until the location is activated.
- Best when: setting up in advance and keeping the acquisition private matter most, and financial activity can wait.
Option 3: Active, Production type, with a placeholder name
Section titled “Option 3: Active, Production type, with a placeholder name”Set the location up as active, so both setup and financial activity are allowed, but use a placeholder name, such as the location code, until the acquisition is final.
- Pros: you can complete the full setup in advance and post financial activity right away, while keeping some confidentiality.
- Cons: the location still shows on users’ screens, which can be confusing.
- Best when: you need both full setup and financial activity before closing, and limited visibility is acceptable.